DO IT FOR THE CHILDREN – FEATURE


This year’s Cycle World/Ride for Kids bike to benefit the Pediatric Brain Tumor Foundation really does combine a few of our favorite things. Put together by Gregg DesJardins of Gregg’s Customs, this one starts out as the excellent little Honda CBR250R, loses a little bodywork, gains some cool bits, including CRG mirrors, and Dunlop tires, and winds up being a dirt-track-inspired street urchin/scrambler that looks like it would be right at home almost anywhere.


Sportchrome (www.sportchrome.com) helped manage the project and contributed design work and paint, which, along with custom graphics, was applied by ColorZone Designs (www.colorzonedesigns.com). DesJardins himself took on the task of making the front numberplate and sidecovers from aluminum, with the “toroidal” shape of the little CBR’s speedo used as a theme throughout the bike.

Performance Machine wheels and brakes for a pre-2K Harley were close to the axle size and hub width of the CBR250R’s, so DesJardins performed a little machining to hubs and rear sprocket to make them work. Then it was time to fabricate a radial-mount front-caliper bracket and a rear one, mount gauges to triple-clamp, remove unnecessary tabs and brackets, attach a custom LeoVince exhaust and about a hundred more details…

And if the CBR’s too rich for your blood, behind door Number Two we have a Honda Ruckus completely artistically fortified by master moto-artisan Troy Lee. Both bikes will be on display at all the Progressive Motorcycle Shows across the U.S. and will be won by two lucky entrants following a drawing to be held in May. If you can’t make it to a show, go to www.rideforkids.com to make a donation and/or enter to win.

By

Harrison-Eureka Springs backroads route


From the top of the Crescent Hotel to the bottom of the “Pig Trail” on Arkansas Highway 23, the Eureka Springs Backroads Route is a memorable route you will want to take. This 132 mile (roundtrip) ride has 571 curves to keep you occupied, with the estimated time at just under five hours.

Directions: Starting from Harrison, turn south on Arkansas Highway 43. Take Arkansas Highway 21 five miles south of Ponca. At the stop sign, turn right towards Kingston heading west on Arkansas Highway 74 to Huntsville. Turn right on Highway 23. You are now on the upper stretches of the famed “Pig Trail” heading to Eureka Springs. After you have experienced Eureka Springs, get back on US 62 heading East until you come to Highway 221 (also known as Race Track Road). Turn right and follow the signs to Berryville and Harrison.
Description: Between Ponca and Boxley you will pass fields on the left which are often full of Arkansas elk that roam the lands of the Buffalo National River. Off to the right is the Lost Valley Trail and camping area. The 2.3 mile trail (roundtrip) is one of the most popular along the 149 mile Buffalo National River, America’s first national river. In Kingston, circle the iconic square (maybe twice) to see the sites. Huntsville is the county seat of Madison County and the original home of former Arkansas Governor Orval Faubus, who became famous for his role in the Little Rock Central High School integration crisis of 1957. His former home is located high above the town. While in Huntsville, a great restaurant to enjoy and popular with bikers is Granny’s Kitchen. You can indulge in homemade food of all kinds, a great atmosphere and some of the best homemade pie in all of Arkansas! Eureka Springs is a quaint, Victorian Village that is a special place to the Arkansas Ozarks. A drive down Spring Street on the Historic Loop is something you do not want to miss. The narrow streets remind you of being in a foreign country that adds to the uniqueness of the city. This route will offer numerous climbs and descents with plenty of thrills. Gas is available in Harrison, Ponca, Kingston, Huntsville, Rockhouse, Eureka Springs, Berryville, Green Forest and Alpena.

HONDA CBR1000RR CATALYST FINDS HOME – SPECIAL FEATURE

Ride for Kids/Cycle World, Gregg’s-Customs winner announced.

All it took was one lucky ticket for Giovanni Velez of Lakewood, New Jersey, to win this year’s Ride for Kids/Cycle World project Honda CBR1000RR. Valez purchased a single ticket at the New York International Motorcycle Show back in December, and he was lucky enough to have that ticket randomly drawn from more than 20,000 entries this past May, just two days shy of his 21st birthday.

“I have my motorcycle permit, but I’ve never had a bike before,” said an ecstatic Velez. “I decided to buy a ticket to help out the charity. This is too good to be true!”

The stock CBR1000RR was donated by American Honda and then handed over to Gregg DesJardins at Gregg’s Customs for its makeover. DesJardins named the bike Catalyst and received support for the build from Sport Chrome, Performance Machine, Dunlop, LeoVince, Drive Systems USA, Kyle Racing, Galfer, Corbin, EMI Group and Colorzone Designs.

Catalyst raised more than $53,000 to benefit the Pediatric Brain Tumor Foundation (PBTF) this year, with theCycle World custom-bike program generating more than $612,000 in donations since its inception in 2000.

For more info, visit www.pbtfus.org/rideforkids.

Do It Yourself Helmet-Cam

By Martin Hackworth, Dec. 23, 2004, Photography by Martin Hackworth


At some point, nearly everyone who rides a motorcycle will attempt to duct tape a camcorder to their gas tank and shoot some "gun camera" footage strafing their favorite canyon, doing the big cohones double jump or caning their two-stroke through the dunes. Unfortunately, the low-tech approach usually yields poorly focused shots through a dirty windscreen and camera get-offs. For professional quality work a compact helmet camera system that uses a digital camcorder as a portable VCR is tough to beat.

If you already own a camcorder you are just a few Ben Franklin's away from narcissistic nirvana starring in your own movies.

Technical Details
You'll need a digital camcorder with either external audio and video inputs or video tape recording capability. In the event that you are using an analog camcorder, gimme a ring, when you decide to join the rest of us in the 21st century. Assuming that you have a digital camcorder, if you can record from a TV onto your camcorder it will function as a VCR and you are set. This feature is available on most digital camcorders and on almost all of Sony's camcorders.

Some bullet cameras have analog outputs that are compatible with external camera inputs, where you bypass the camcorder's camera but retain all of the rest of the capture features. As it turns out, many camcorders are not equipped with this feature but it's nothing to worry about. Overwhelmingly most helmet cam systems bypass all of the camcorder's video/audio preamps and just use the camcorder as a VCR. All you'll need is the ubiquitous AV Mini - Phono (RCA) x 3 cable to connect all of your external video and audio with almost any camcorder.

Inexpensive bullet cameras come in basically two configurations: either 380 or 480 lines of resolution and NTSC or PAL output. I find that the 380 line cameras work just fine and are a good deal less expensive. In North America, any camera that you purchase should communicate with the camcorder in DV-NTSC format (in Europe DV-PAL is the standard). Some high-end cameras will output either format. In the event that you are using an analog camcorder, gimme a ring, when you decide to join the rest of us in the 21st century.Be aware that by using your camcorder as a VCR you'll bypass not only onboard audio and video capture but also most, if not all, of the capture features such as image stabilization, low-light shooting, etc. This is actually not as much of a problem as it sounds since digital video editing/processing software will fix (albeit with some effort) most problems that occur during capture.

The system I use (pictured below,) consists of a bullet camera purchased through eBay for about $150. The camera is a 380 line CCD color unit with a 1/8" mini-plug output. It came with an optional camera housing, a 12-volt battery pack, various RCA connectors, and stereo 1/8" phono plugs (stereo mini-jacks). I purchased an AV Mini-phono (RCA) x 3 Cable at Radio Shack for connecting all of the audio and video feeds to a Sony TRV-340 camcorder via the A/V jack. I also use a stereo RCA-to-mini jack adapter, for audio and a couple of RCA turn-arounds for interconnectivity. The camcorder and pre's go in a "Camelback" style backpack that's low profile and aerodynamic, you can also use a simple fanny pack. The bullet cam attaches to my racing helmet with industrial strength Velcro and I've never had it move as much as a smidgen, when subjected to howling 150 mph winds. For my dirt-bike helmet, I have a small mounting bracket that attaches the camera conveniently via one the visor screws.

For quality audio I use a Sound Professionals SP microphone preamp (available at: http://www.soundprofessionals.com/cgi-bin/gold/category.cgi?category=540&template=mics for about $160). This preamp provides phantom power to the microphone (so that it can be powered with a easy to find 9-volt battery instead of the AG13/LR44 onboard "watch" battery used by the mic) and has an adjustable gain control with three ranges. The use of this high-end preamp allows one to fully exploit the wonderful sonic qualities of the Sony ECM-717 directional stereo microphone (about $90). A very nice feature of directional mics is that they reject sound outside of their pickup patterns and thus, in most circumstances, minimize unwanted sounds such as wind noise if you can aim them properly.

Many digital camcorders have an external microphone input for use with a top mounted shotgun mic but this input generally bypasses the audio preamp built into the camera and thus requires the use of an external preamp to produce the required line level signal. If you plug a small condenser such as the ECM-717 into this jack without a preamp (such as the SP) it will produce audio but at extremely low levels. Since I use the A/V input for the video feed the external mic input is disabled anyway and the point is moot. However, you should be aware of the issue, should you decide to shoot video without the bullet cam but with an external microphone for good audio which you might, on occasion, want to do.

Putting Together a System

My favorite one-stop place to look for all my helmet camera needs is helmetcamera.com. You can't go wrong there.There are several methods of putting together a helmet camera video system with an external microphone that will produce excellent results. Because I own an audio business, I feel very comfortable sourcing individual components and assembling my own systems. With some careful web shopping; if you are familiar with A/V components and interconnectivity you will easily be able to put together an excellent system along the lines I've described above (without the high end preamp and mic,) for less than $300. However, if you are one of those individuals who are befuddled by the flashing 12:00 on your VCR every time the power goes off, have no fear - it's easy to purchase a complete "turn-key" helmet camera system from any of several vendors on the web. My favorite one-stop place to look for all my helmet camera needs is http://www.helmetcamera.com/. Dan Krahling the proprietor of this site, is an ex-racer who puts together high quality systems that are rugged and quite inexpensive. You can't go wrong there. Dan and his crew will hook you up with a fabulous plug and go system.

I chose each of the seven clips that accompany this story to illustrate a particular advantage or limitation of helmet-mounted camera systems and external microphones.

The first two clips are from a dirt bike trail just a few miles from my home in Idaho. I really like the way the pipe sounds in these clips with gear changes and engine revs easily audible. I clipped the ECM-717 to the bottom of the fanny pack and was able to get it aimed in such a manner that the pipe was squarely in the middle of the mic's pickup pattern. The clips are video of a 5-minute ride up a canyon covering a distance of about 2.5 miles over fairly rocky terrain. In this case one of the major strengths of the helmet mounted camera system, it's location on the highest, most stable and smoothest position, has the effect of slowing down motion, thus making the terrain appear less rugged than it really is. You have to look for the fender, which is occasionally visible in the lower portion of the frame bouncing up and down to give a sense of the fact that major portions of this trail are composed largely of loose softball-sized rocks. There are a couple of pretty good whoops near the top of the trail (second clip) and other that a brief increase in engine revs and relative stillness of the shot for a second you'd never notice that you were in the air.

If you get some great shots make sure to send them in to us. We are always on the lookout for anything that smacks of mayhem or stupidity.

The next clip is from a Friday track day at Willow Springs. On a racetrack, the stability of the helmet-mounted camera is a big benefit and produces wonderfully clear, rock steady images. Not only can you benefit from watching video of yourself shot by someone else, but I learned a lot from watching the video I shot myself (especially with open track ahead) about my cornering lines and head position (which is key to body positioning). Just be aware that the wide-angle nature of the lens means that you have to follow quite close to anyone whom you are attempting to shoot.

On this particular day, the wind was blowing at approximately 40 mph most of the afternoon, so you'd get a lot of wind noise in the audio signal, even while sitting still in the pits. In the clip, the wind is blowing so hard that if you pay attention you'll see my riding partner, John Fisher, nearly get blown off his bike just before I pass him on the inside at the beginning of the front straight (a little before midway through the clip). In windy environments, there are two options for getting clear sound, one much better than the other. The first and best option, is to just clip the mic to the bike as close to the rear of the silencer as possible. This works on the street, but many track organizations will not let you out on a track with a camera system unless it is fairly well zipped up. The second option is digital filtering of the audio track, to electronically reduce the wind noise.

The last clip is from Galena Pass, near Sun Valley ID and was shot on Memorial Day 2004. The distortion of the image by the wide-angle nature of the camera lens tends to make oncoming traffic appear to be moving more slowly than it is, until it reaches the edge of the field of view. Even though the winds were blowing 30+ mph near the top of the pass the audio comes through nicely because the microphone is clipped to my license plate holder and is pointed right at the end of my silencer at a distance of about 6 inches.

In all cases, the mpegs format necessary for transmission over the web reduces the quality of the images. The native AVI images are bold, smooth, and have little to no grain, even when played on a large screen TV. I apologize for the wonky camera aiming, but at the time I shot these clips, they were just for personal use and I didn't bother to get the camera mounted exactly straight on the Velcro. It Ôs always advisable to make a test run or two, to finalize the lens aiming, before doing the bulk of that day's filming.

That should about do it. If you get some great shots make sure to send them in to us. We are always on the lookout for anything that smacks of mayhem or stupidity.


AMA Supercross: 2012 St. Louis Results

Ryan Villopoto returned to the top of the podium and extended his lead in the 2012 AMA Supercross Championship to 13 points with a victory at the Edwards Jones Dome in St. Louis, Mo.

The Monster Energy Kawasaki rider had his win streak snapped at three after losing toRed Bull KTMs Ryan Dungey last week in Atlanta, Ga., but Villopoto returned to form in St. Louis for his class-leading fifth win of the season.

The reigning champion got off to a good start in the St. Louis main event, trailing only holeshot taker Davi Millsaps of YGRMX Yamaha. By Lap 3, Villopoto had taken over the lead, which he held the remainder of the 20-lap race for the win.

Finishing second was Dungey who sits second behind Villopoto in the standings. Dungey ended the first lap in fifth place but moved up to third by Lap 9 behind Villopoto and Muscle Milk Honda‘s Justin Brayton. Dungey passed Brayton on Lap 13 to move into second place but could not catch Villopoto, finishing 2.403 seconds behind the winner. Brayton held onto third for his first podium of the season.

While Villopoto and Dungey finished one-two in St. Louis, James Stewart slips further out of contention for the 2012 championship. While his rivals have been consistent all season, Stewart had another challenging race in St. Louis. The YGRMX Yamaha rider crashed on the opening lap but still managed to finish the race in fifth place. That gives him 152 points on the year, 40 points behind Dungey and 53 points behind Villopoto.

With Stewart’s title hopes fading and barring injury, the championship chase is more or less down to Villopoto and Dungey. Villopoto is in control with 205 points while Dungey remains in striking range with 192. Next weekend’s race in Daytona Beach marks the start of the second half of the season, which promises to be an intriguing duel between Villopoto and Dungey.

[Source: AMA Supercross, with photos by Hoppenworld.com]

How do I find the helmet that’s right for me?


Picking out the perfect motorcycle helmet can be almost as time consuming as deciding on what motorcycle to buy.


There's more at stake than fashion. A helmet is one of your first steps to being a safe rider. Here are a few things to keep in mind when choosing the headgear that's right for you.

Is it DOT approved?

First, make sure the helmet has the Department of Transportation's stamp of approval. This means the helmet passes federal safety standards and will do a sufficient job of protecting you in the case of a Maryland motorcycle accident.

Is it comfortable?

A helmet is for safety, but if it's too uncomfortable you may not wear it at all. Make sure you choose one that feels right.

Experiment.

Different brands, sizes, and types of helmets will all fit differently. Experiment. Try on several to see what works for your head shape.

Check the fit.

The helmet should be snug - without giving you a headache. You should be able to move your head up and down without the helmet bouncing. If it bounces around, it's too big.
Also keep in mind that there are different helmets for men and women.

Skip buying used.

While it's tempting to buy your helmet for cheap on Craigslist, there is always the chance that a used helmet has already been in a crash and its reliability impaired.

Go for color.

A brightly colored helmet will help other drivers see you better. Go ahead and grab a flashy helmet.

By Rick Lundin

How to Load Your Motorcycle

Motorcycles can be a great way to commute, transport smaller stuff from point A to B, or travel, sightsee and tour.

Depending on how much you carry, however, added weight can affect wear and tear on the whole bike, including suspension, tires, drive train, and brakes. It can also affect how well you can brake, corner, and of course, accelerate.

The more you pile on, the more you need to pay attention to where you place heavier items, how you attach them, and what the added ballast placed in various spots on your bike does to handling and control.

Following are some pointers to keep in mind, whether you are carrying the least or the most:

Keeping It Light
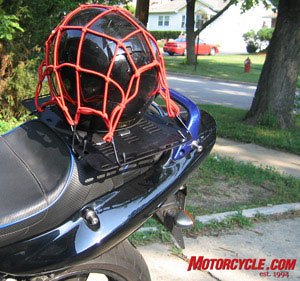
Make sure your tie downs can’t come loose. You don’t want a bungee wrapped around your wheel.

Make sure your tie downs can’t come loose. You don’t want a bungee wrapped around your wheel.

If you are only taking home a small bag from the store bungee netted or corded to the passenger seat, at least make sure these tie downs cannot come loose.

Not only is it easy to lose things off the back, a dangling bungee can become a major hazard. Some people hesitate even recommending stretch cords at all, because riders have been wacked in the face by a recoiling bungee hook, and even worse, others have gotten them spooled up in a wheel.

If you have doubts, use a tank bag, tail pack, or the like.

A knapsack can work too, but think about what you put in it. While small backpacks – and waist packs, messenger bags, etc. – are convenient, if you put bulky, hard objects in them, those items could be crunched into you if you went down.

On the other hand, a backpack could add protection just like a spine protector would, if you carry softer objects, or broad, flat ones like a book.

And as a side note, always think about what you have riding on your body. A cell phone in a pants pocket or on a belt clip, for example, could be smashed if you fell, just when you need to call 9-1-1. Any hard object like a tool stashed in a pocket, could potentially do damage. Never carry items inline with your spine.

Balancing Act
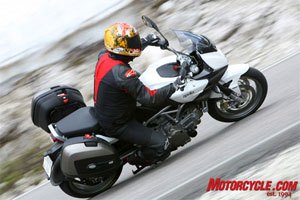
Try to distribute the weight evenly when loading up your bike.

Try to distribute the weight evenly when loading up your bike.

If you want to really load up your bike, a rule of thumb is to try to keep the bike’s weight distribution proportionally close to what it is when un-laden.

As it is, there are all sorts of bags made that can be placed front to rear, be it on the forks (not a great idea if it could affect steering) to a sissy bar, if you have one.

If you overload a single bag, though, it’s easy to upset balance, as many riders have found out. For example, a heavy bag on the rear of a powerful bike could make it wheelie prone, or at least make it wallow in the corners.

On short wheelbase sportbikes especially, heavy tail packs, saddlebags, or even passengers can make them more likely to wheelie.

This should tell you that the situation is compromised, and you might want to think of ways to even up the weight distribution.

One way to help restore closer-to-original mass centralization is to place heaviest items in a tank bag if you can with your kind of bike.

At the very least – for any bike – you will need to crank up your rear suspension settings, and understand that in corners, more weight is pushing the back tire.

Adding weight can have an effect not just front-to-back, but it’s also possible to affect balance left-to-right with very unevenly loaded saddlebags, and how high you place weight above the center of gravity matters too.

A Heavier Subject
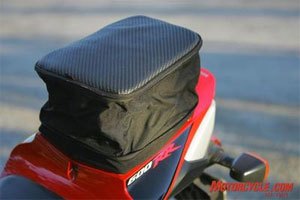
Be sure to find out exactly how much weight your bike can carry before you load it up.

Be sure to find out exactly how much weight your bike can carry before you load it up.

The Gross Vehicle Weight Rating (GVWR) is the recommended maximum you can carry, and includes the weight of the bike, plus everything on it.

To determine how much the manufacturer says you can safely carry, take the bike’s wet weight (full of fluids), and subtract it from the GVWR.

So, say after subtracting the weight of the bike, you find it can carry 380 pounds (172 kilograms). This would include you and a passenger, if any. If you weigh 180 pounds (82 kilograms), and your passenger weighs 140 pounds (64 kilograms), you can try to put an extra 60 pounds (27 kilograms) on the bike.

If your VIN plate and owners’ manual don’t list your GVWR, you can ask your dealer, or call the manufacturer’s toll free customer service line.

Another weight load parameter is Gross Axle Weight Rating (GAWR). This refers to the maximum weight you can put on the front axle and rear axle.

A little advice: If you are taking a long trip, and have enough stuff to more than max out your safe carrying capacity, either leave some of it at home, or think about shipping it. Your bike will thank you, you’ll enjoy the ride better, and also have a better chance of getting there.

Rolling Along

The tires’ maximum loading capacity and pressure are marked on the sidewall. Underinflated tires effectively reduce carrying capacity, so when adding weight, make sure they are fully inflated.

Air should be installed “cold,” as it would be first thing in the morning before riding. A pressure reading on a tire you’ve been riding on will be higher. Having your own known-good pressure gauge also helps.

Packing It All In
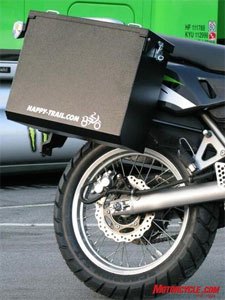
Hard bags can be a little pricier, but your goods will be safer and better protected from the elements.

Hard bags can be a little pricier, but your goods will be safer and better protected from the elements.

Obviously some bikes are more suited to loading up than others. Touring bikes and big cruisers with hard bags are practically turnkey ready to head coast to coast.

Standard motorcycles, dual-purpose types and sportbikes may not be as ready, but they can be made ready with soft or hard luggage, depending on your ambition, preferences, and discretionary funds.

Hard bags are sturdier and more watertight, but take a bigger commitment.

Only a few manufacturers offer soft bags that are 100 percent waterproof. Others offer rain covers, but these define compromise: They take up space except when in use, tend to eventually leak, may not fit when the bag is stuffed, interfere with bag access when they are on, and can blow off and be lost.

One trick to making sure your camera and clothes or whatever else doesn’t get wet is to use dry bags such as kayakers use. These have a roll top closure and are designed to keep gear dry as toast even if dropped in a river. They come in various types and sizes, and fit nicely in motorcycle bags.

Getting Hitched

As previously covered, there is a whole submarket out there for trailers that larger bikes can pull. Some people say, “You don’t even know it’s there” when traveling with a well-fitted trailer.

Outfitters offer hitches that bolt to the bike, and trailers come with one or two wheels, and can carry a bunch of extra gear. Others are designed as haulers for pets as large as a Saint Bernard, or as little pop-up campers.
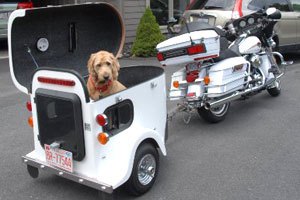
Most manufacturers don’t recommend adding a trailer hitch to a motorcycle. Doing so may void your warranty.

Most manufacturers don’t recommend adding a trailer hitch to a motorcycle. Doing so may void your warranty.

What do Honda, Kawasaki, Yamaha, Suzuki and Harley-Davidson say about all this though?

They say if you do it, you are on your own. None of them test any of their bikes or approve them for pulling a trailer.

According to Tim Rice, a customer analyst for Kawasaki, even a full-size tourer is engineered more like a sports car than a pickup truck.

“When you buy an F-150 it has a certain tow rating,” Rice said, “ours have zero tow rating.”

He talked about having to deal with customers who called to complain after their dealers refused warranty coverage because they found bolt holes from which a trailer hitch had been hastily removed.

Further, if a person did load a trailer heavily enough, regardless of what it may or may not do to the bike, all that weight behind you could hit you in a crash, or pull the bike off course in a worst-case scenario.

If you think this is all baloney, that’s fine too. There are many manufacturers and sellers ready to help you on your trailer-towing way, but remember the bike was not designed for what you may want to do.

Conclusion

Every bike is different, so you’ll want to learn the ins and outs of what you can do, and what others have already done with your kind of bike.

There are a lot of different ways to carry things, but it also helps to understand basic principles and only do what you are sure is a good idea.

Jeff Cobb is the editor and publisher of Motorcycle Safety News. Comments and questions can be directed to jeff@motorcyclesafetynews.com.